
Are you sure that's not going to drop out?
- by Peter MoseleyDid you know, when it comes to holding in your Aircraft Batteries: THERE'S A RIGHT WAY AND A WRONG WAY TO USE Hook & Loop Fastenings.
What mode of separation does your Hook & Loop Fastener attempt to resist during flight?
Recently, I saw someone's electric powered plane after it had abruptly descended to a less than pretty outcome. The reason - the battery and plane had parted company in midair - and of course, from that moment of separation, the fate of the plane had been almost inevitable.
It occurred to me, that with many more pilots having a go at electric power these days, we are looking at a lot of them moving from fitting the tiny receiver batteries, found in IC powered planes, to them having to secure the somewhat larger airborne battery packs of electric flight.
There is, it would appear, a need out there to know how best to secure these larger, heavier, airborne battery packs - so, here's my thoughts on the subject. Hopefully they might benefit the longevity of a few planes - and maybe even one or two batteries, as well.
Luckily, over the last few years, the move from the old and heavy Nickel Cadmium packs to the much lighter Lipo packs has reduced the need to dwell so long on producing a means of securely fixing the battery - reducing the need to actually engineer something substantial. And, indeed, substantial fastenings were a must, in days gone by, if you wanted to make sure those 'weighty, flying NiCd bricks' didn't 'hop out' of the fuselage and spoil the day.
Heavy NiCds might require things like cable ties and wood screws to tame them.
The slight downside to this move to lighter LiPo batteries has been that the less rigorous requirements for securing them has let us usually get away with methods utilising just Hook & Loop fastening tape - and indeed often get away without really questioning how robust and suitable the installation really is.
But don't get me wrong - Battery Pack retention in our model planes using Hook & Loop fastening tape is great. I now use it all the time. It's easy to fit - and it CAN be an effective solution.
BUT - and here's the rub - just like there is a right and wrong way to run the grain in a piece of wood so that it best bears the required loading - THERE IS A RIGHT AND WRONG WAY TO USE HOOK AND LOOP FASTENING TAPE.
If you stop and think about it - using a strip of Hook & Loop Fastener, there are essentially 3 ways of pulling the 2 mated strips apart:
A) There's peeling from one end - by lifting one end and progressing the separation along the strip - this is the way we normally pull 2 mated strips apart. This has the LEAST resistance to parting being in the order of just 2 pounds per square inch, when the fastening is clean and new.
B) Then there's pulling the mated strips apart with a force at 90 degrees to their mated surface plane - this would be the force direction applied to the fastener if we had stuck, say, hooks to the floor of the inside of the fuselage and loops to the face of the battery pack - pressed the battery into the fuselage so the strips mate and then inverted the fuselage. This is the tensile strength of the Hook & Loop Fastener and when clean and new is about 11 pounds per square inch.
C) And thirdly, trying to pull the mated strips apart by shearing force - try getting about an 8 inch length of Hook & Loop Fastener and place them so only 4 inches actually mate, leaving 4 inch 'tails' either end - grab a 'tail' in each hand and pull as you would a Christmas cracker - this is testing the shear strength, and using the fastener so that the operational forces act in this way, is the BEST option for obtaining max strength in use.
About 22 pounds per square inch when clean and new.

So, you might argue, my 3 cell 2200mAh Lipo battery only weighs 200grams (0.44 pounds) - even if I do aerobatics that pull 4 or 5G that's only peaking up to about 2 pounds of pull on that fastener. Plus, using simple strips of fastener on fuselage and battery, as in example (B) we would be looking at 11 pounds per square inch of mating strength. That's got to be way, way enough.
The trouble is that the pulling, or tensile strength we see in example (B) is only if we gently roll the plane over to be inverted - if we pull a tight turn while inverted, then because the battery wants to maintain a straight line trajectory, it tries to 'unpeel' itself from the plane and travel at a tangent to the turn, so it is trying to pull the fastener apart by it's weakest mode of separation: peeling, as in example (A).
Now in this 'peeling' mode of separation, we only have 2 pounds per square inch mating strength and that's with new and more to the point, clean Hook & Loop Fastener strips.
The quoted parting strengths are only found with clean and new fastener strips - this drops off by some 50% with repeated use and even more when adding in contamination of things like oil off of hands and bits of grass.
So now we can start to see why a 2 or 3 inch length of fastener on the face of a battery and fuselage might sometimes prove inadequate for packs weighing in above around the 2000mAh 3 cell size.
And this is not to mention the fact that the example (B) fixing, relies just as heavily on the self adhesive backing to the fastener strips. How can you be sure that the adhesive's not letting go when the going gets tough.
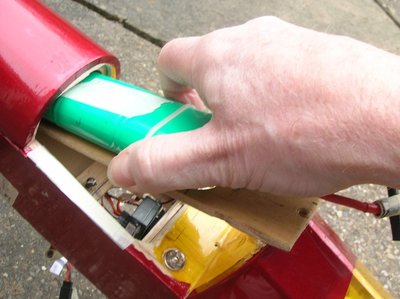
Also, so far I've been saying this danger only exists if you start gyrating about inverted, but so far I've been discussing models having their batteries fitted in from the top of the fuselage. Unfortunately, a lot of models don't have their battery packs fitted in from the top of the fuselage, they're in effect pushed upwards from below - so on these planes, manoeuvres like an ordinary loop or sharp turn are trying to unpeel the fastener's mated surfaces - and this is ordinary flying for a lot of pilots.
BUT ALL IS NOT LOST, when it comes to wanting to use Hook & Loop Fasteners for retaining those moderate sized packs - here's a way to do it that uses the adhesive backing in a 'minor role' and makes use of the Hook & Loop Fastener's strongest separation mode - as in example (C)
It gives excellent resistance to vectored movement in all 3 dimensions and to rotational movement in 2 dimensions, and gives quite adequate rotational movement resistance in the 3rd dimension if 2 straps rather than one are fitted.
The first requirement is for an adequately strong ply or lite-ply base on which the battery will be held. This needs to be slightly larger than the plan-form size of the battery and to be well fixed to the fuselage - 6mm square balsa strips run down both long side edges - both above and below the ply - will beef up the security and the 'under strips' also ensure a space for the Hook & Loop to pass underneath the ply.
Here's a pic of what we're aiming for, here:
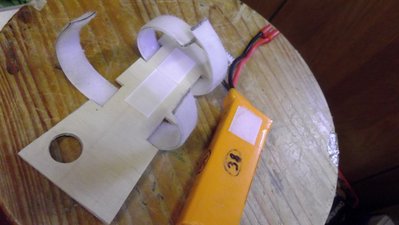
Here we see the ply plate - a little longer than the battery so as to allow adjustment of the battery position a little, if required, to accommodate tweeking the c of g.
The ply width fits snugly against the fuselage walls and the 4 notch cut-outs, for the 2 straps, narrow the ply at these points to equal the battery width.
The 2 straps are each made from a length of loops on the inside stuck to a length of hooks on the outside.
The length of each strap is sufficient to pass under the ply and encircle the battery, plus about a 4 or 5 cm overlap - this overlap forms the mated area which, in use, will experience shear force as in example (C)
ie. The fastener is working in its strongest mode.
Note that on the bottom of the battery and down the centre of the ply are strips of fastener - these are again being used in shear mode as they are there simply to prevent fore and aft movement of the battery through the straps - essential if you've not made a very good job of tightening the straps around the battery as you overlap the ends and mate them.
Also, to stop the straps accidentally sliding out from behind the ply (be difficult to thread them back round the underside of the ply once it's glued in place in the fuselage), to avoid this there is also a small 'keeper' square of fastener stuck to the underside of the ply at each of the strap's locations thus:
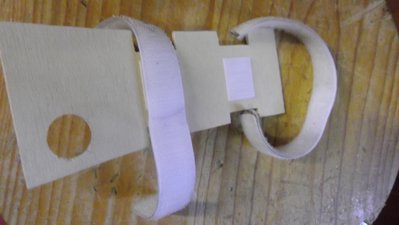
This all results in an installation looking something like this:
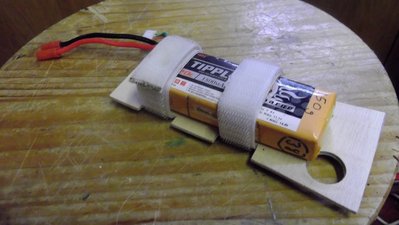
Best to put it all together before fitting into the plane, so as to make sure you're happy with the positioning of the straps so the overlap is going to be in the right, 'get at able' face of the battery - you can see in the pic that I have them positioned so the overlap is all happening on the upper face of the battery. Adjust them now, because once in the plane you wont be able to slide them at all, due to those small 'keeper' squares on the underside of the ply - and they're to stop the straps accidentally pulling out from under the ply while you're fiddling about with them.
One hook & Loop manufacturer recommends that for the self adhesive backing to stick its best, then the fastener tapes and the surface they are to stick to should be at between 20 and 38 degrees C for a minimum of one hour before application.
If you opt to go for this style of retainer then I'd recommend you adopt a standard - I always fit the loops (the soft furry strip) to the batteries (to stop fore and aft movement) and so it's a corresponding strip of hooks that goes on all the ply plates in all my planes - that way the batteries are compatible for use in each plane.
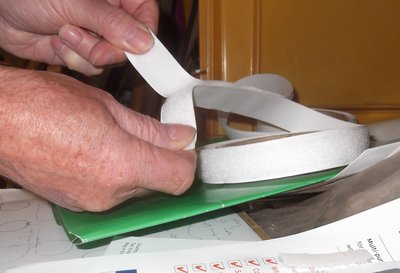
Making up the straps requires a bit of care, to align the length of hooks with the length of loops as their sticky surfaces are brought together. And to aid with this and to ensure that the gluing together of them both introduces a natural curved 'set' to the straps - so they readily want to curve around the battery - I 'assemble' them on something suitably cylindrical like a mug or, in this case, a small tin of soup!:

I use the soft loops on the inner surface of my straps, so in this pic you'll see I started with affixing 2 small pieces of hooks onto the soup tin and wrap the loop strip tightly between them, around the tin.
Then I peel off its adhesive backing protection and then align the hook strip and peel away its backing while progressively sticking it to the back of the loop strip that's on the tin - so it's adhesive side sticking to adhesive side - thus giving me a strap with loops on the inside and hooks on the outside.
All this I know will be pretty obvious to a lot of you, but maybe you hadn't previously considered that there was indeed a weak way and a strong way, when it comes to using Hook & Loop Fastenings and how that might just be worth thinking about when it comes to sticking it onto those airborne batteries.
I don't know the limits for this style of retention system with regards to the size / weight of the battery, or the maximum G force it will withstand, but for Lipo's of up to 3 cell 3000mAh size, my experience has been that it's pretty rock solid - with whatever aerobatics you put it through.
Return to Articles Home